Unreal Engine
[Unreal Engine 4 etc.] 입력장치 구분하기
한돌이
2022. 8. 26. 17:33


입력 장치가 키보드/마우스인지 게임패드인지 구분하는 기능을 구현하겠습니다.
블루프린트로는 매우 간단하게 구현할 수 있습니다만 코드로도 구현하겠습니다.
/**
 * 입력 장치를 나타내는 열거형입니다.
 */
UENUM(BlueprintType)
enum class EPRInputDevice : uint8
{
	InputDevice_KeyboardMouse		UMETA(DisplayName = "KeyboardMouse"),
	InputDevice_Gamepad				UMETA(DisplayName = "Gamepad")
};
입력 장치를 구분하는 열거형 변수를 만듭니다. 이 부분은 블루프린트 변수로 만들어도 됩니다. 또는 bool 형으로 '입력장치가 게임패드인지 아닌지'로 만들어도 됩니다.
블루프린트
블루프린트는 플레이어 컨트롤러 블루프린트에서 다음과 같이 구현하면 끝납니다.
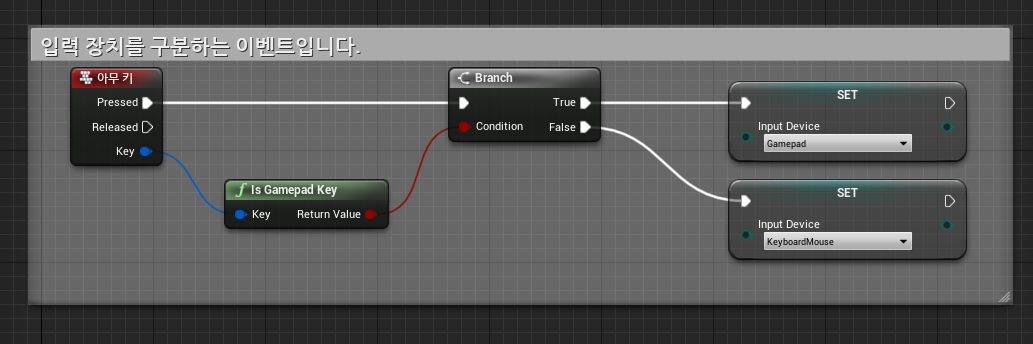
처음 아무 키 이벤트를 생성한 후 위와 같이 구현한 후 게임을 실행하면 정상적으로 움직이던 캐릭터나 키 입력이 안될겁니다. 이 때 아무 키 노드의 Consume Input을 false로 설정합니다.

C++ 코드
C++ 코드으로 구현하는 방법은 다음과 같습니다.

프로젝트 세팅의 엔진 - 입력에서 액션 매핑에 아무 키를 바인딩합니다.
플레이어 컨트롤러에서 다음과 같이 구현합니다.
PlayerController.h

protected:
	virtual void SetupInputComponent() override;

#pragma region InputDevice
public:
	/**
	 * InputDevice와 입력 받은 인자가 같은지 판별하는 함수입니다.
	 * @param NewInputDevice InputDevice와 같은지 판별할 입력 장치입니다.
	 * @return InputDevice와 입력받은 인자가 같을 경우 true를 다를 경우 false를 반환합니다.
	 */
	UFUNCTION(BlueprintCallable, Category = "InputDevice")
	bool IsEqualInputDevice(EPRInputDevice NewInputDevice) const;

	/**
	 * 게임패드의 입력인지 키보드/마우스의 입력인지 확인하고 InputDevice변수를 변경하는 함수입니다.
	 * @param Key 입력한 Key값입니다.
	 */
	void AnyKey(FKey Key);

protected:
	/** 입력 장치를 나타내는 열거형입니다. */
	UPROPERTY(VisibleAnywhere, BlueprintReadWrite, Category = "InputDevice")
	EPRInputDevice InputDevice;

public:
	/**
	 * 입력 받은 인자로 InputDevice를 설정하는 함수입니다.
	 * @param NewInputDevice 새 입력 장치입니다.
	 */
	void SetInputDevice(EPRInputDevice NewInputDevice);
#pragma endregion
PlayerController.cpp
void APRPlayerController::SetupInputComponent()
{
Super::SetupInputComponent();
FInputActionBinding& CheckInputDevice = InputComponent->BindAction("AnyKey", IE_Pressed, this, &APRPlayerController::AnyKey);
CheckInputDevice.bConsumeInput = false; // 우선권 상관없이 실행합니다.
}
#pragma region InputDevice
bool APRPlayerController::IsEqualInputDevice(EPRInputDevice NewInputDevice) const
{
return InputDevice == NewInputDevice;
}
void APRPlayerController::AnyKey(FKey Key)
{
if(Key.IsGamepadKey() == true)
{
SetInputDevice(EPRInputDevice::InputDevice_Gamepad);
}
else
{
SetInputDevice(EPRInputDevice::InputDevice_KeyboardMouse);
}
}
void APRPlayerController::SetInputDevice(EPRInputDevice NewInputDevice)
{
InputDevice = NewInputDevice;
}
#pragma endregion예시로 점프 기능에서 입력 장치를 구분해보겠습니다.

Jump 액션 매핑에 키보드와 게임패드의 버튼을 바인딩합니다.
플레이어 캐릭터 클래스에서 다음과 같이 구현합니다.
PlayerCharacter.h

protected:
	virtual void SetupPlayerInputComponent(UInputComponent* PlayerInputComponent) override;

	/** Jump 키를 누를 경우 호출하는 함수입니다. */
	virtual void Jump() override;
PlayerCharacter.cpp
void APRPlayerCharacter::SetupPlayerInputComponent(UInputComponent* PlayerInputComponent)
{
Super::SetupPlayerInputComponent(PlayerInputComponent);
PlayerInputComponent->BindAction("Jump", IE_Pressed, this, &APRPlayerCharacter::Jump);
PlayerInputComponent->BindAction("Jump", IE_Released, this, &ACharacter::StopJumping);
}
void APRPlayerCharacter::Jump()
{
APRPlayerController* PlayerController = Cast<APRPlayerController>(GetController());
if(IsValid(PlayerController) == true)
{
if(PlayerController->IsEqualInputDevice(EPRInputDevice::InputDevice_KeyboardMouse) == true)
{
PR_LOG_SCREEN("KeyboardMouse");
}
else if(PlayerController->IsEqualInputDevice(EPRInputDevice::InputDevice_Gamepad) == true)
{
PR_LOG_SCREEN("Gamepad");
}
else
{
PR_LOG_SCREEN("None");
}
}
ACharacter::Jump();
}