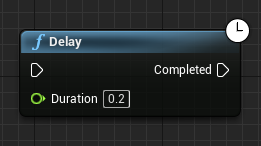
블루프린트에서 사용하는 Delay 노드를 C++에서 SetTimer를 활용하여 구현하겠습니다.
SetTimer를 활용하여 Delay를 구현하는 2 가지 방법이 있습니다. Lambda를 사용하는 방법과 딜레이 후 함수를 호출하는 방법입니다.
1. Lambda 사용
	float DelayTime;		// 딜레이 시간
	FTimerHandle TimerHandle;
	GetWorld()->GetTimerManager().SetTimer(TimerHandle, FTimerDelegate::CreateLambda([&]()
	{

		// 딜레이 후 동작 구현

	}), DelayTime, false);
2. 딜레이 후 함수 호출
- 함수에 매개변수가 있는 경우
	float DelayTime;		// 딜레이 시간
	FTimerHandle TimerHandle;
	FTimerDelegate TimerDelegate = FTimerDelegate::CreateUObject(this, &Class::FunctionName, Args...);
	GetWorld()->GetTimerManager().SetTimer(TimerHandle, TimerDelegate, DelayTime, false);
- 함수에 매개변수가 없는 경우
	float DelayTime;		// 딜레이 시간
	FTimerHandle TimerHandle;
	GetWorld()->GetTimerManager().SetTimer(TimerHandle, this, &Class::FunctionName, DelayTime, false);
'Unreal Engine > C++' 카테고리의 다른 글
| [Unreal Engine 4 C++] C++에서 참조 인자를 가진 함수를 블루프린트에서 호출할 때 출력이 아닌 입력으로 참조 인자 사용하기 (0) | 2023.01.10 |
|---|---|
| [Unreal Engine 4 C++] UENUM을 USTRUCT에서 변수로 사용하기 (0) | 2022.12.31 |
| [Unreal Engine 4 C++] C++에서 구현한 정적 함수와 일반 함수의 블루프린트에서 사용시 차이점 (0) | 2022.09.26 |
| [Unreal Engine 4 C++] DrawDebugLine의 InWorld인자 주의점 (0) | 2022.03.04 |
| [Unreal Engine 4 C++] FRotator로 ForwardVector와 RightVector 구하기 (0) | 2022.02.07 |
